

Guide to Creating a Perfect Seamless Pattern in Adobe Illustrator

Learn how to create seamless patterns in Adobe Illustrator with my simple guide. Watch my quick tutorial video and start designing amazing patterns today!
Struggling with patterns that just won’t line up correctly?
With just a few simple steps—and the right Pattern Options Panel settings—you’ll be creating flawless seamless patterns in no time. At the end of this post you can watch a quick tutorial to see how it’s done!
Key Steps for Seamless Patterns in Adobe Illustrator:
Refine your design by simplifying elements for a polished look.
Arrange your layout to ensure a natural, balanced flow.
Use the Pattern Make feature to set up a perfect pattern tile.
Fine-tune using the Pattern Options Panel—adjust tile type, overlap, and spacing for a seamless repeat.
Test your pattern on a mockup to preview how it applies to real-world designs.
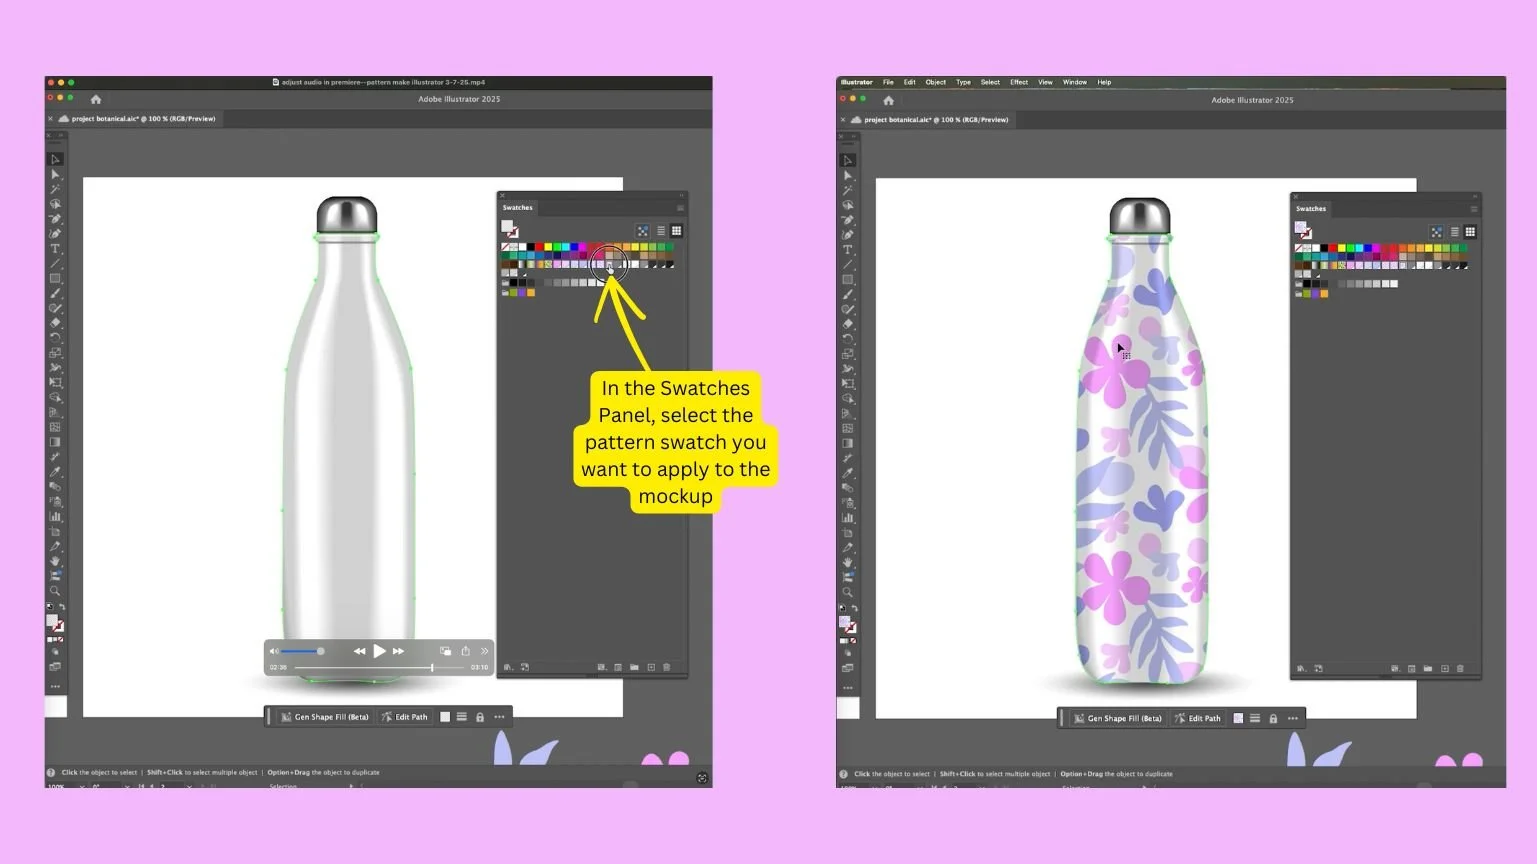
To Image from Adobe Illustrator showing how you apply the pattern swatch to the vector mockup in Adobe Illustrator.
Getting the right settings in the Pattern Options Panel is key! I’ll walk you through how to adjust tile size, spacing, overlap, and preview settings so your pattern is perfectly aligned and scalable.
Whether you're designing for branding, textiles, or digital art, this workflow will save you time and elevate your patterns.

In Adobe Illustrator’s Pattern Options Panel you can see how I created a seamless botanical pattern with pink and purple floral elements. The pattern panel shows a tile using the grid layout, with options for overlap, copies preview, and swatch boundaries. See why I picked these options in the steps below.
Pattern Options Panel and why I picked these settings.
With the Pattern Make feature and the Pattern Options panel, I can tweak spacing, overlap, and tile arrangement to make sure everything repeats seamlessly. This preview helps me fine-tune the final look.
Tile Type: Grid – This keeps everything lined up neatly in rows and columns for an even, structured pattern.
Width & Height: 4x4 inches – A perfect square makes sure the pattern tiles seamlessly.
Size Tile to Art: UnChecked – This gives me manual control over your tile size rather than having Illustrator automatically adjust the tile dimensions to fit my artwork.
Move Tile with Art: Checked – If I tweak my design, the tile moves along with it, keeping everything aligned.
Overlap: Bottom Left on Top – This controls which parts of the pattern stack on top when elements touch at the edges. I chose bottom left on top to create a more natural flow.
Copies: 5x5 – This just helps me preview how the pattern will repeat across multiple tiles.
Dim Copies: 70% – Fades out the extra copies so I can focus on editing my main tile without distractions.
Show Tile Edge & Swatch Bounds: Checked – This outlines my pattern tile, so I can clearly see where one tile ends and the next begins.
Once I’m happy with the pattern, I save it as a swatch and test it on a larger canvas. And there you have it—a clean, seamless repeat pattern ready to use
Watch this quick tutorial below to see step by step how it’s done
With these simple steps, you can create beautiful, scalable patterns for branding, textiles, or digital design. Give it a try and let me know what you create.
In this quick tutorial on creating a seamless pattern using Adobe Illustrator, I show you how to arrange your elements and use the Pattern Make feature to set up a perfect pattern tile and then how to test how the pattern looks when applied to a water bottle mockup.
PRO TIPS
Advanced techniques for pattern creation
Experiment with Color Variations:
Create multiple color schemes for your pattern to expand its usability across different projects and client needs.Experimenting with color variations in Adobe Illustrator 2025 can greatly enhance the versatility and appeal of your patterns. Here's how you can create multiple color schemes for your pattern designs:
Select Your Pattern Artwork:
Open your pattern design in Illustrator and select the entire artwork you wish to recolor.
Access the 'Recolor Artwork' Tool:
With your artwork selected, navigate to the top menu and choose
Edit > Edit Colors > Recolor Artwork. This will open the 'Recolor Artwork' dialog box.
Explore Color Variations:
In the 'Recolor Artwork' dialog box, you'll see the current colors of your design.
To experiment with different color schemes: Click on the 'Edit' tab to access the color wheel. Here, you can adjust individual colors or link harmony colors to shift hues collectively.
Utilize Adobe Illustrator’s Mockup Feature
Adobe Illustrator offers a built-in Mockup feature that allows you to apply your vector art onto images of real-life objects, such as product packaging, apparel, or digital devices. This feature automatically adjusts your design to fit the curves and edges of the object, creating a realistic mockup.
Consider Using Adobe Photoshop for Raster Mockups:
For mockups involving raster images or requiring advanced photo editing:
Adobe Photoshop offers robust tools for applying patterns to templates, such as apparel mockups. You can select a template, add a Pattern Fill layer, and adjust the scale and angle to suit your design.